Showing posts with label log cabins. Show all posts

Thursday, August 04, 2016

Gwennie Medallion QAL Part 3 - Update

Remember that my log cabin border wasn't done on Basket #1 in my last post?  Well, I couldn't let that just sit there mocking me.  Something had to be done.


This is where I was on Monday.  The more I looked at the Courthouse Steps partial border, the less I liked it.  I decided that it might be best to just keep things simple.


Ta da!  I finally have the log cabin border done!  It is a simple log cabin-style border, with two light sides and two darker sides.  I think it gives the quilt some "breathing room" and kind of calms those crazy 9- patches, instead of getting too busy.  And now this will work better with the Star border that is our challenge for August.  I'm happy with this now.  And I already have some ideas of where I want to go next!

This weekend is my DH's big art show out in the garden.  He's been working like a slave to get everything ready, and tomorrow is set up.  Hopefully we'll have good weather, not too hot and not rainy.  We seem to be one or the other every year.  The weather report looks good for not too hot, but we may have some showers.  And I hope we get lots of customers!  Cross your fingers for us!

Have a great weekend.  I hope you have some time to be creative!

Tuesday, September 16, 2014

Making Some Progress - and A Quilt!

What a slacker!  I can't believe it's been nearly a month since I posted!  I kept meaning to, but just never really got to it.  I composed lots of posts in my head, but never actually made it to the computer.  Hopefully I can break that trend.

Things are progressing around here!  The physical therapy that I'm doing is starting to pay off.  I'm finally off those darn crutches and am now using a cane.  (I should feel dapper, maybe, but I don't.)  And I am starting to wear a shoe - well, a sandal.  My ankle is still swollen and the shoe hurts, but I'm very tired of walking across parking lots and public restrooms in a mostly-bare foot.  (I still have to wear the brace)  The worst was the floor in the movie theatre - ick!  I'm starting to get around pretty well, and actually went to the grocery store by myself yesterday for the first time in 2 months!  Who knew that going to the grocery store would be something to celebrate?  hee hee!  It was a short trip, and I was pretty tired by the end, but I did it!  Just as an aside here - a cane and a shopping cart are an awkward combination, especially when the thing doesn't fit into one of those cute little carts.  The whole thing with this injury has been a lesson in patience, which I've never been known to have in abundance.  I think a little humility was thrown in there too.

"Vienna Melody"
53 x 74 inches

Here is a quilt that has actually been done for a while, but I don't think I've ever shown it here.  This was a charm square project.  I bought the charm squares and all the companion fabrics years ago, and finally got this finished.  The fabric was "Vienna Nights" by 3 Sisters for Moda, for those who might care.  Charm squares were a brand new thing then, just to give you an idea of how long ago it was!  

the quilting

It's not my favorite quilt.  It's lovely enough, and there's nothing wrong with it at all.  I just feel like it's got no "soul".  There was none of "me" put into this quilt, if you know what I mean.  No creativity. I made two quilts this way, and I learned my lesson.  (you'll get to see the other one as soon as I finish the binding!)  I don't think I'll ever make another quilt just from one line of fabric.  I guess I'm a scrap quilter at heart! 

I'm actually going to be trying to sell this quilt at the quilt show next month.  No one in the family is interested in it, I don't care, and maybe I can make some money to use towards a new computer.  (Mine is an XP, which is pretty much a dinosaur.)  I've never sold a quilt before.  Have you ever sold a quilt?   


"Leftover Lemons"
15 x 15 inches
I got my little "leftovers" quilt all quilted and bound now.  It feels good to have another finish!

I'm starting to put the finishing touches on my things for the quilt show.  Putting on bindings and labels, etc.  I have to have my quilts turned in by Oct. 1st, so the heat is on!

I thought I would share a little trick I use for putting on the binding:


After the binding is made, I do a fan fold with it.  Hopefully you can see what I mean from the photo.  I used to wind it onto a small ruler, but it always got all twisted up.  So I tried using the fan fold, which doesn't twist it at all.  My DH fan folds (instead of wrapping) all his electrical cords before he stores them, which gave me the idea.


Then, I take the fan folded binding and put it into a zip-lock baggie. I close the opening of the baggie except for a hole big enough to feed out the binding.  Then I drop the baggie onto the floor between my feet and start putting it on the quilt.  I've never had it hang up or twist on me, and it works a treat!  I don't know how others do it, but this is my way.  Anything that makes it easier to do is good to know.  Let me know if you try this and how it works for you.

It's been pretty warm here for the last few days, but I think that's just Indian Summer.  Leaves are starting to turn, and the nights are getting pretty chilly.  We were down in the 40's the other night.  The geese started flying north in mid-August this year, which to me seems really early.  Everything seems to be starting earlier this autumn, which to me says we just might be in for a bad winter this year.  I didn't seem to get enough summer this year, just because I couldn't get out and enjoy it so much after mid-July, when I had my accident. 

Hopefully I can post more often now.  I've got more to show you!

Tuesday, July 15, 2014

Less Stalling, More Doing

Yes, I've actually managed to complete something!  One done, one to top status.

"Lemonade"
21 in. by 25 1/4 in.

I finally got my challenge quilt done, and in time for the reveal picnic too!   Makes me wonder why I stall so much when I have to scramble to be done in time.  Read more about this project here and here.


The Potter came up with the name for this, and I love it!  You know the saying . . . "when life hands you lemons . . ."  Perfect fit, isn't it?  I'm really happy with this - it finished up much better than I thought it would in the beginning.  I don't even see the Ugly Fabric (lemons) anymore!

I dipped into my scrap bin for all the fabrics for this quilt.  I went way back in time for some of these fabrics.  I guess I now know why I'm saving all those old fabrics.  "Old" being a relative term - most of these are from the 90's, so technically not that old.  They are slowly getting used up.  Good thing too, because I'm getting tired of some of these fabrics.  And some I still love and enjoy.  But I'm not really into that antique-y look anymore.  I crave bright happy colors and fabrics now.


Of course, I only have to look at the back of this quilt to see the lemons.  I had to include them in all their ugly glory, just so I can remember which ones they are.  The scraps of the lemons went in the trash.  Nobody wanted them!  And the other fabric?  I used up a half yard of some unloved fabric in my stash plus a little extra of another.  You can see the quilting I did better on the back too.  I used white thread in the light parts of the log cabins and a dark blue thread in the dark parts.  I wanted to emphasize the zigzag design of the log cabin blocks.

I ended up making 99 half square triangles because I had no idea how many I needed for the borders.  The first ones I made weren't even close to being enough.  So I cut and sewed and cut and sewed until I had over 10 feet of half square triangles!  Yikes!  It was a staggering amount, to my mind, especially for such a small little quiltlet.


Dunkel wanted you to be able to judge the size of the quilt quickly.  Also, it didn't have enough cat hair on it.  Maybe not the most flattering shot of him?


I did manage to get a shot of his "better side".  He hates the camera.

"Leftover Lemons"
14 3/4 inches square
Remember the wrong size blocks I had?  (See my previous post)  Well, I came up with something to do with them.  And I couldn't just toss the rest of those HST's!  So I got creative for the borders, because I absolutely was not going to make even one more HST.  I really like this too.  Now to get it quilted and bound, which may be awhile.

both "lemon" quilts together
I almost like the border on the smaller one better than the border on the larger one.  And it would have been less work too.  I need to remember this!

Today I'm making and attaching labels to a few quilts that will go to the county fair tomorrow.  My labels aren't fancy or elaborate in any way.  I subscribe to the theory "finished is better than perfect".  If I waited until things were perfect, they'd never get done.  You'll notice that does not rule out doing it at the last possible moment.  *ahem*

Sunday, June 29, 2014

Avoidance Technique Projects?

I was lucky enough to snag a copy of Andrea Balosky's book "Transitions: Unlocking the Creative Quilter Within" (the link will take you to Amazon) at the Puyallup Valley Quilters guild's annual book sale for only $2!  Score!  (if you get the chance to read this book, do so!  wonderful insights into the artistic process!) So, this morning I was reading the part where she discusses the Creative Process and . . . *gasp* I recognized myself.  She was talking about when you are faced with doing something to your project that you'd really rather not do so you go into "avoidance mode" and do something else, like cleaning the studio or something.  Anything but what you'd rather not do.  I know you know what I'm talking about . . . I think we all do it sometimes.  You can call it stalling as well.

Well, I have to admit - mostly to myself - that I was stalling.  I need to do more to my Cherrywood project (see it here)  and I don't want to.  I've decided that I need to add more of the little inserts, which involves undoing parts of the top.  So, major avoidance is occurring.  I know I'm just being stubborn and I'll eventually get it done.  But it's truly amazing what else I can get done when I'm in avoidance mode!

17 1/4 in x 21 3/4 in without borders

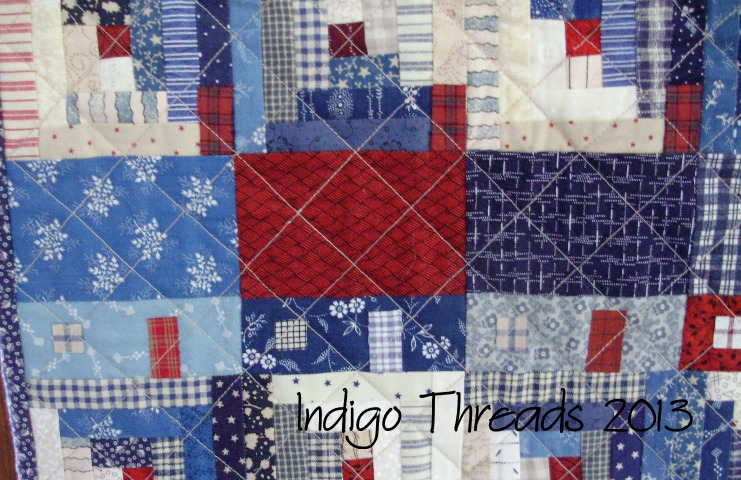
Avoidance Project #1 - my Ugly Fabric Challenge quilt is nearing completion!  And about time, too, as it's due on July 11th!  I finally made up my mind what to do with the hideous fabrics I received.  I flailed around for awhile, and then I remembered Bonnie Hunter's saying "if the fabric is still ugly, you haven't cut it small enough".  Bingo!  What's the best way to use it?  Little pieces.  What's the best way to disguise it?  Put it with similar fabrics.  Thus, the log cabin.  So far, without the borders, the top is at 17 1/4 in. by 21 3/4 in.  Those center squares are 1 1/4 inches finished.  The border triangles will also be that size.  Pretty darn little, and kind of pain to make those HST's!  

arrows point out the Ugly Fabrics
This is a close up of the Ugly Fabrics and how I used them.  The middle fabric isn't too bad, so I used it as is.  The other two I've used the wrong side up.  Makes them play better with everything else.


At one point, after I had taken a break (the next day, I believe), I needed to cut more of the center blocks.  Well, apparently I didn't  measure correctly.  But I didn't discover my error until I was trying to assemble the blocks.  These blocks have a center square that measures 1 1/2 inch cut instead of 1 3/4 in.  That 1/4 inch is hard to see, but so important to the finished size of the block!  So, I have 10 extra blocks the wrong size.  *sigh*  We'll see what becomes of these blocks later, when I decide.

So, now I'm stalling about cutting more of the little HST's for the border.  Fortunately, I didn't fold and put away the fabrics yet.  So, that's what I'll be doing very soon.  That approaching due date is starting to motivate me!  So, even more Avoidance is going on around here!  (It's getting pretty bad, huh?)

Modern Disappearing 9 Patch
50 3/4 in x 64 in at this point
In the meantime, here are my other Avoidance Technique projects.  A.T.P. #2 is now assembled and ready for borders.  Fabric has been purchased for said borders and binding.  I need to get this done P.D.Q. so it can get to the quilter and back in time for the quilt show in October.

17 in x 24 1/4 in

A. T. P. #3: another preemie quilt.  I got it quilted at a guild workshop on Friday, now I need to find binding and do that.  No rush on this one.

detail shot
I don't have any baby fabrics, but I thought these worked OK for a little girl.

44 in x 58 1/2 in

A.T.P. #4: the String X quilt got borders!  I went to see the Keeper of the Guild Fabric the other day and found something that works.  It's not what I initially had in mind, but I like it.  Nicely bright and cheery.  This will go to a local facility for seriously ill and frail children.


The yellow fabric has little tiny bees all over it.  

So, I guess I've stalled long enough now!  But, didn't I get a lot accomplished??  Not finished, but accomplished.  Two different things - in my world anyway. *grin*  I amaze myself sometimes.  hee hee!  I really need to finish the challenge quilt because of the looming due date.  So, that is first on my agenda.  Then I think I'll move on to the Mod D9P so it can go to the quilter.  Then maybe I can actually pick up the seam ripper and work on my Cherrywood project so it can be done in time for the quilt show too.  Wish me luck!  Or maybe you should come over and give me a kick in the butt!

So, inquiring minds want to know:  what do you do when you're experiencing the Avoidance Technique?   Do you recognize it when you're doing it?  How do you move past it?  

Monday, May 20, 2013

Hometown U.S.A.

Whoo hoo!  The Blogger's Quilt Festival is on again.  There are so many new blogs to visit and gorgeous quilts to view.  I hope you'll take some time to visit them.  And a huge Thank You to Amy for putting on this fun on-line quilt show!

I would LOVE to read your comments, but due to wanting to visit as many entrants as possible this week, I won't be answering comments.  However,  I will gladly visit your blog and leave a comment for you!  Thank you for understanding.

This is my second entry in the Festival.  You can see my other entry here.  Strangely enough, both of my entries are log cabins and challenge quilts!  This quilt is entered in the "Wallhanging" category.

Hometown U.S.A.
18 inches by 25 inches
This quilt was made for a Log Cabin challenge in my guild in California.  We had a specific size requirement to meet.  This pattern was in a Country Threads quilt book, and if I reduced the dimensions of the project in the book by half, it would be the exact correct size.


These logs finish at 1 inch.  I did not paper piece this.  Really, it was easy enough that I didn't need too.  I picked out my blue fabrics and the off-white fabrics, cut them into 1 1/2 inch strips and put each set into a paper bag.  As I pieced, I simply pulled a blue strip from it's bag or an off-white from it's bag and sewed it on.  My only "rule" was that I couldn't put the same fabric touching itself anywhere in the quilt.  I believe I managed that, but I really haven't looked that closely since I made this! *grin*


It's all pieced except for the chimneys and windows on the houses, which are fused on. Oh, and the star on the flag is fused, as well.


When I quilted this, I made sure that I stitched through all the fused elements just to make sure that they would stay put.


I even carried the patriotic theme onto the back!  This quilt hangs in my guest room, which I decorated in a red, white & blue patriotic theme.  

Surprisingly, even though the log cabin block is one of my all-time favorites, I have yet to make a log cabin quilt that is big enough to snuggle with!  


I would be honored if you would vote for my Hometown U.S.A. quilt in the "Wallhanging" category.  Thank you!

Minimalism

It's time for the Blogger's Quilt Festival again.  I think it's so fun to visit new and familiar blogs, meet new people and see great quilts!  Thank you, Amy, for hosting this once again.  Grab your favorite beverage and settle in for some super "quilt time" as you visit all the entrants.  And don't forget to vote for your favorite quilt!

I would love to read your comments (I LOVE comments!), but owing to wanting to visit as many entrants as possible, I won't be answering comments this time.  But I will gladly visit your blog and leave a comment for you!  I hope you understand.

I'm going to share a quilt that has been done for a couple of years, so I apologize to my regular readers for any boring repetitiveness.  Please bear with me.  I've entered this quilt in the Two Color Quilt category.  You can see my other entry in the Quilt Festival by going here.

Touch of Black: A Study in Minimalism
30 inches by 38 inches
This wallhanging is an original design, inspired by the works of Yoshiko Jenzenji.  I had seen photos of quilts by Yoshiko on various sites on the internet and was quite intrigued by what she was doing.  (This link takes you to her site, which is in Japanese.  However, there are quite a few images of her work, which don't need translation.)  I decided to challenge myself to see if I could get the same effect.

detail 1

I didn't know at the time that I first saw her work that Yoshiko had come out with her own line of fabrics.   I decided to just use some of my graphic black & white fabrics that I had been stockpiling.  (AKA "The Stash")  So, lots of white fabric with a few fussy-cut black & white pieces.

detail 2

This quilt was also going to be my challenge quilt for my guild that year, and we were suppose to do log cabins, which were perfect for this  self-challenge.  You can read more about my process here.  My log cabins aren't perfect and I didn't win anything in the challenge competition, but this is still one of my favorite quilts.  I still love the not-so-straight-line quilting that I did on this quilt.  It doesn't distract your eye from the black graphic elements.  This quilt just makes me happy when I look at it, which is a success in my book!

detail 3

As a matter of fact, I'm thinking of making another one!  Maybe the next one will be in black with white accents.  Hmmmm.....  I still have lots of black & white strips cut.

I would be honored if you would vote for my quilt for your favorite in the Two Color Quilt category.  Thank you!

Sunday, October 28, 2012

Blogger's Quilt Festival

It's time for Blogger's Quilt Festival again, brought to us by the lovely Amy of Amy's Creative Side.  Yay!  I love seeing all the wonderful quilts that everyone has made, and I especially love hearing all the stories of how and why each quilt came into existence.  If you love that too, grab your favorite drink and go take a look at them all by clicking on the link above.


My entry into this version of the BQF is my wallhanging Lib Logs (and Prosper).  (Regular readers of my blog are probably tired of seeing this quilt, so please, bear with me.)  I started this in a class with Gwen Marston on "Liberated Log Cabins".  I loved that class - Gwen is so knowledgeable and generous with her time, attention and information!  Plus, she's just so funny!  


And one of the best parts of the class was that I got to meet and stay with a bloggy friend, Sharon of Grass Roots Quilting.  We had such a fun weekend talking, laughing, eating and quilting together.  Sharon donated a strip of the hot pink fabric to this quilt, which was exactly the zing it needed.  Thanks, Sharon! 


This is such a happy quilt - at least it makes me happy seeing it hanging on the wall.  I love the bright, cheerful colors.  This is my husband's favorite quilt too.  He was the one that insisted that I enter this quilt in the Western Washington Fair, where I won a Third Place ribbon on it!


The log cabins are all free-pieced, which means no pattern, no particular sizes of cut strips and no planning.  Just cut up some strips and start piecing.  It is hard to "let go" and be improvisational, and yet it's the most fun I've had in quilting in years.  If you're interested, I recommend Gwen's books Liberated Quiltmaking II, Collaborative Quilting (with Freddy Moran) and Freddy and Gwen Collaborate Again as starting points.

I started with the plaid fabric as my focus fabric and used it for the centers of the log cabins, and then put the last of it on the outer borders.  All the other colors were pulled from the focus fabric.  One of the unexpected things I like is that the green dotted fabric in the first border creates a "see-through" effect in the log cabins where the same green fabric is.  It really gives some depth to the quilt.


The pieced borders are also free-pieced, and were a lot of fun.  So much so that I plan on using the triangles again in another quilt (or two)!

I did an all-over "organic" straight-line quilting (which is really not-so-straight) on this quilt on my Bernina, and I like how it seems to unify the quilt.  The whole quilt is rather flattened from the quilting, which I think really lets the piecing show well.  However, I quilted around the big dots in the aqua fabric, just to make them pop.  Fun!

Blogger's Quilt Festival Stats:

Quilt Title:  Lib Logs (and Prosper)  #378
Quilt Measurements: 31.5 inches square
Special Techniques: Liberated Free-piecing
Quilted by: Me, Sharon K.
Best Categories: Home Machine Quilted Quilt, Wall Hanging

Don't forget to vote for your favorite quilts November 5 - 8!

Wednesday, June 06, 2012

My 15 Minutes

No, not playing with scraps.  My brush with Fame.  Hee hee!  (As an aside here, I have to say that Andy Warhol had no idea of the internet when he said his famous quote.)

After my post on my little quilt I made in class with Gwen Marston, Kathie over at Inspired By Antique Quilts blog was inspired to make a little quilt using the same colors as mine.  She was nice enough to ask me if I would mind (I didn't), and then she blogged about all this.  Well, my stats went through the roof!  I got so many visitors, and also some new Followers.  Thank you, Kathie!!

And then, I discovered that my new Liberated Log Cabins quilt (see previous post) was featured on Craft Gossip.com!  Woo Hoo!

This has been fun!

Back to our regularly scheduled programming now.


Sunday, June 03, 2012

Two Finishes!

Lib Logs (and Prosper)
31.5 inches square

Ta Da!  Here is my liberated log cabin quilt - all finished!  I had this done in time to take to my class with Gwen Marston a few weeks ago, which was my goal.  I wanted to show Gwen my finished project from the class I took with her on Liberated Log Cabins last year.  

You can read more about this quilt here and here.

I've just been calling this "Lib Logs", but that's not a very catchy, creative title.  I need to come up with something better before I do the label for this!  Anyone have any suggestions?? 

Edited to add:  Thanks for all the suggestions for the name!  I've decided to go with something I came up with at dinner the other night:  "Lib Logs (and Prosper)".  It's silly and it makes me smile!


I did all-over "organic straight line" quilting . . . which means there's not really any straight lines. *grin*  And I'm really happy with how it worked out.  The quilting seems to unify the whole design.  The whole quilt top is rather flattened from the quilting, which I think lets the design of the piecing show up well.  When Gwen saw this, she asked me "Do you want me to show you how to keep your quilting lines straight?"  She had a great big twinkle in her eye when she said that!  Love it!

I quilted around the big dots in the aqua.  It just seemed like emphasizing those dots was the right thing to do!


Here's a detail shot.  I like how the green border fabric that is in the log cabins makes that part of the block seem to be transparent . . . like there's an empty place in the log cabin and you can see the border fabric "showing through" there.  


One of the triangle borders.  Can you see that subtle triangle?


One of the pieced insert borders.  And more "transparency".

This was a fun class to take and a fun quilt to make.  It's my new favorite!

Indigo & Cheddar
21 inches wide x 19 inches high

I also finished Indigo & Cheddar, from the Small Quilt class with Gwen this year. (see previous post)  I machine quilted this with the "fake hand-quilting" stitch on my machine.


Here's a detail shot.  It doesn't really look like hand-quilting, but it's different from plain machine stitching. 

I went outside my comfort zone with the binding.  Gwen suggested I use this red fabric.  I was dubious, as it wouldn't have been my choice at all.  But I decided to trust Gwen and I love the way it looks!  I also tried the binding method I saw at The Quilting Edge blog.  I didn't do a perfect job, but I think with some practice it will go better.  It was slick and I can see me doing more of this!  It's certainly faster than doing it by hand, and easier on the hands as well.

Kathy over at Inspired by Antique Quilts has been inspired by this little quilt to make one of her own!  Isn't that fun?  Go check out what she's doing.  I can't wait to see what she'll come up with.  I know it will be wonderful.

Monday, May 14, 2012

This, That and The Other


I had three quilt guild meetings last week!  We have both a day group and a night group in one guild, and I ended up going to both meetings.  The night group was Monday night, and that's when we received the pattern and instructions for the blocks we need to make for our raffle quilt for this year.  The pattern was this scrappy 8 inch star, and the directions were for earth tones.  If you've been reading this blog for awhile, you know I almost never do earth tones!  I had to look for some examples in some quilt books to help me out a little.  You'll notice I actually do own plenty of the earth tones. 


We need to make at least 2 blocks each, so I wanted to get these done for the day meeting on Friday.  It took hours to cut all these pieces!  I was trying to not have both blocks exactly the same.  I used scraps, as much as I could.  I mean, that's why I have them, right? I'm happy with the blocks - I think they came out pretty good for someone that really doesn't do earth tones.


For Mother's Day, Dear D-I-L treated all three of us (her, me and her Mom) to pedicures.  That was a treat - my very first pedicure!  It won't be my last. LOL  My toes are the purple with the polka dots.  They make me smile every time I see them.


I finally got my liberated log cabins quilt top pin-basted and I've started the quilting.  I'm maybe 1/4 of the way done with the dense quilting.  But now I'm stalled because I've run out of thread.  Rats!  Off to the quilt store in the morning for more thread.


You can see better how far I got on the quilting in this picture.  Well, except for Hamlet sitting on the quilt!  When I stopped for dinner and lack of thread, I brought the quilt downstairs so everyone could admire what I have so far. Hamlet decided to jump the gun and do some premature quilt inspection!  I want to have this done by the weekend.  So, you know what I'll be doing this week!  Wish me luck.

Monday, April 30, 2012

A Flimsy, Finally

Here's some early May Day flowers for you!


My granddaughters came over on Saturday, and A~ wanted to make paper flowers.  I kept making them after she left!  They were fun.  I used this tutorial.  They call them carnations, but I think mine look more like ranunculus. They were fun to make!  A~ and I made more and different flowers than this, but I forgot to get a picture of them.  She wanted some flowers for the pottery vase that DH made for her - how sweet!  

I have to put these up where Dunkel can't get to them, because he gets them and carries them around the house at night.  When I woke up yesterday there was one lying in the upstairs hallway.  At least it wasn't in bed with me!  (Have I ever mentioned what a crazy cat Dunkel is??  He often brings his toys and puts them in bed with us at night.)


The pipe cleaners were still out on the counter when The Kid got home and made a disturbing discovery with his package of Twizzlers.  Weird, huh?  Is all that food coloring even good for you?  I'm guessing Not.


OK, enough silliness - back to quilting now!  Here is my Liberated Log Cabins from the other day.   I finally got it all sewn together and the first border on it.  

I had started the Liberated Equilateral Sawtooth border in the class with Gwen Marston last year.  Gwen had demonstrated it for us.  I was a little worried because I couldn't quite remember how to do it.  So you can imagine how relieved I was to find that the instructions are also in her Liberated Quiltmaking II book! (page 67)  It was easier than I remembered it.  I had so much fun I made 2 borders!


The 2nd border I managed to get even wonkier.  I got brave enough to play around with it, and I'm really happy with how it worked.  I like it so much I may have to make a whole quilt like this someday!.


I thought maybe all triangles in the borders might be overpowering for the log cabins, and I wanted to mix things up some, so then I made the pieced insert borders.  Those were fun too.  Finally I tied it all together with more of the plaid that is in the centers of the log cabins.  And look, there's even points on some of those triangles!  So, it's now a liberated not-really-but-kind-of-medallion!  


And this is all that's left of the plaid fabric.  Enough to do a little something on the back of the quilt, hopefully.  Which I will try to do sometime this week.  I want to get this basted and ready to quilt soon.

My crumb blocks quilt is back from the long-armer, and I'm currently getting the binding done.  I'm almost 1/2 way around the quilt, so pictures to come soon!  Which is a good thing, because the next quilt is already in the mail and on it's way here.  Whoo hoo!  I LOVE getting quilts back from the quilter!