Showing posts with label little quilts. Show all posts

Thursday, June 29, 2017

Bird is the Word*

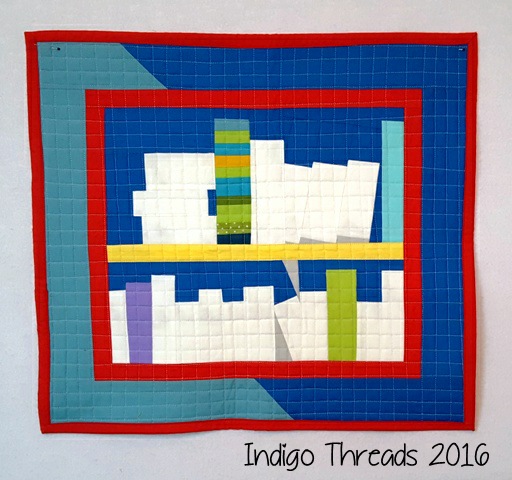
"Bird" is the word I drew for the Animal Challenge by the Tacoma Modern Quilt Guild.  

"Bird is The Word"
19.5" w X 18" h
The word brings to mind so many possibilities....owls, penguins, emus, cardinals, eagles and so on.  But I knew immediately that I wanted to make my bird with Lynn's tutorial.  Lynn blogs at Patchery Menagerie, and her tutorial is available on her Etsy site.  I've long admired Lynn's way with improv and especially her fabric choices.  So I bought both the bird tutorial and the tutorial on making your fabric work for you.  Both are immensely helpful! And a very reasonable price for all the information she gives you.


The quilt had to be no smaller than 12 x 12 inches and no larger than 24 x 24 inches.  I think that's a great size for a challenge quilt.  It only took me 3 tries to get a bird - the first two times I cut the fabric wrong for the wing.  The rest of the bird was pretty easy.  

check out the little ladybug button!
 But he looked a little lonely by himself.  I didn't want a very big quilt, so I didn't really want to make more birds.  Then I got the idea to do the birdhouse.  After that it just came together easily.  I kept the quilting simple too, as I was running out of time to get the quilt done before the meeting.  I'm very pleased with how my little challenge came out!


* Bird is The Word was a crazy song from 1963 by The Trashmen.  You can watch the video here, which is so bad, it makes the song even crazier!


I'm supposed to be sewing a particular quilt top together, but I wasn't quite feeling it.  So I found something else to work on.  I found this one, hiding in a pile of other projects.  I started these blocks a few years ago.  2011 to be exact.  Ok, I guess that's 6 years ago, slightly more than a few.  Wow, a little longer than I realized! You can see previous posts about this here and here.  When I pulled this out, I only needed a few more blocks.  So I made another 12!  It is set 6 blocks across by 8 blocks down, and it now 60 inches by 80 inches, with only 2 blocks left over.  I've decided what I want to do for the border and am auditioning sizes right now.  I used my brightest plaids for this quilt and it's pretty intense in person.  I love it!  And another long-time WIP almost finished!  Yay!

I had to stop working on this one to do some secret sewing.  I need to get my other guild's challenge quilt quilted.  It's all pin basted and ready to finish this weekend.


Another plaid project!  My local guild had a sew-in day where we were taught this simple quilt pattern to be used as a charity quilt.  It uses 9 fat quarters.  Except my woven plaid fat quarters weren't 18 inches across.  I pre-wash all my fabric and the FQ's had shrunken up to 17 inches across, so I ended up cutting into yardage.  It was a pretty simple pattern to do, and everyone's quilts looked so different with the different fabrics!  Now I need to trim that bottom edge, baste it and get it quilted.  It's bigger than I like to do myself, but I think simple quilting will be OK.


Here is my sample block for the Tacoma MQG's Block of the Month for July.  It's a fun, easy block and I want to make some more before the meeting.  The tutorial by Cluck Cluck Sew for this one is here, if you want to make it too.  The original quilt looks a lot different from this block!


My DS recently made a wedding gift for some friends, and I thought you'd enjoy seeing it too.  He made a woodburned clock for them, using a celtic Tree of Life design.  I think he did an beautiful job!

For Father's Day, we went with the family to Point Defiance Zoo in Tacoma for the day and it was a lot of fun.  The zoo had an amazing display of artwork called Washed Ashore on the zoo grounds, and I think you might enjoy it too.  It's very creative work.  Be sure to click on each photo to see it bigger.  They are incredible!

The explanation of these art works goes like this: 

About Washed Ashore - All of the plastic on these sculptures was collected from beaches by volunteers.  Each sculpture is designed and directed by a lead artist and then created through a collaboration of the artist, Washed Ashore team members and volunteers.

An ocean wave

The other side of the wave has a sea turtle!


The marine debris in this sculpture includes shot gun shells, disposable lighters,
 bottle caps, flip flops, toy shovels, soda bottles and a boogie board. 

It was fun to look at each sculpture and try to find what items were used.  There were even more sculptures, and all were just as good as these are.  I love seeing how others are creative!

That's it for now....Happy quilting, have a great weekend and Happy Independence Day to my American readers!

Linking up with Crazy Mom Quilts' Finish It Up Friday.

Wednesday, March 01, 2017

AHIQ and Random Stuff

It's time for the monthly Ad Hoc Improv Quilt challenge link-up and I'll be linking up with Kaja at Sew Slowly.  I missed last month as I was in Las Vegas, and I don't have a lot to show this time, but I will share what I do have.


I was inspired, around Valentine's Day, to make some wonky hearts!  A "squirrel" project.  You know what  I mean.... an-out-of-the-blue, wild-hair hankering to make some little hearts.  I decided to go with bright solids with text and low-volume prints.  I do so love that combo!  Well, I'm a little rusty at making wonky hearts and the first two hearts didn't quite make the cut, but I kept going and the hearts  have improved.  I'm starting with 5 inch squares of the solid color and when I'm done, I'll cut all the hearts down to a common size.  I think.  I have no plan for these, I'm just playing and having fun!  I used Lazy Gal Tonya's tutorial for the wonky hearts.  You can see it here.


The other improv project was also hearts!  I made some blocks for the Block Lotto drawing in January.  Improv "slabs" were the basis for the hearts. The pattern is here. They're not the most improv-looking, to me.  If I were to make more, I think I'd get a little crazier.  *grin*  Sadly, I didn't win the Lotto, but I had fun making the heart blocks.

and even more hearts!
DS and I were going to bake Valentine's Day cookies, but as we were preheating the oven, we heard some strange noises coming from it.  The electric element was on fire!  It was like arc welding going on in there!  Yikes!!  I turned off the oven, but the fire was kept going.  So, not knowing what else to do, I called 911.  The nice firemen came and unplugged the oven/stove and told me not to use it!  Fortunately the cookie dough was still in the fridge, so we didn't lose it. Not having the stove top or the oven made making meals a little challenging until the repairman got there.  We went out to dinner a couple of times and BBQ'ed and microwaved.

In the end, we got a new element installed in the oven and we finally got our cookies baked about 10 days late.  Better late than never... and they were still yummy!


These Japanese X and Plus blocks were the January Block of the Month for the Tacoma Modern Quilt Guild.  We used this tutorial at Christine's Color Connection blog.  They were easy and they came out the right size with no problems!  You can see the finished quilt here.  (That committee is some fast sewists!)

Boy blocks

And these string blocks were the February BOM.  For these blocks we used the Scrappy Strings tutorial from Cluck Cluck Sew.  We adapted the pattern by using a few more strips than called for to end up with 10 inch blocks.

Girl blocks
Most of our Blocks of the Month go to the charity quilt committee to be made into quilts to give away.  This month the call was for blocks for kids' quilts in particular.  I think these came out so cute!


My other quilt guild makes quilts for a local hospital's babies.  Most of them are small to be used for preemies and also early demise - the  little ones that don't make it.  This is one I made from hand-me-down scraps.  I've gotten it quilted and found a fabric for the binding....now I just have to do it!   Hopefully by the guild meeting on Friday.


Remember this one?  I started this in January 2015 and it was meant to be a long term project.  You can see the beginnings here.  I've had the blocks done for a while (see them here) and I'm finally starting to sew them together.  Two rows done!  Moving right along....    I want to have this finished for the quilt show in September, so I can't stall too long on this.  But I have a 3 day workshop coming up the middle of this month and that has me kind of distracted. 


Another scrap project.....some badly needed new hot pads.  I even used scrap/leftover bindings.


And, my giggle for the week, a Star Wars Tie-Fighter Tie!  I love it!

Tomorrow I'm going to Sew Expo with some friends.  That will be fun!  I haven't gone for a few years.  It's so massive that it's sometimes hard to find what I want, but I have fun looking. It's not as big as Pacific International Quilt Festival that I used to go to in California, but still big enough to do some damage.  $$$!  Let the shopping begin!

Tuesday, December 27, 2016

A Catch Up and AHIQ - December 2016 edition

Merry Christmas to all my blog friends!  I hope you have a Happy New Year too!

Wow, what a busy month December has been.  Not a surprise at all, is it?  I am surprised that I'm managing one last blog post this year....Yay me!

We had a wonderful Christmas this year.  A little different, in that we did all our socializing on Christmas Eve which means we got to spend Christmas Day at home for the first time a in few years.  That was nice - very relaxed!  No schedule, no visitors, no stress.  I actually slept in until 12:30 in the afternoon!  It was the latest in the day that we've ever had Christmas.  We just had sandwiches for dinner.  And then we watched the Dr. Who Christmas Special.  A very lazy Christmas and I thoroughly enjoyed it.

I haven't done any sewing this month, other than some little snack bags for the granddaughters.  *sigh*  I really need to clean the quilt studio before I can do much more.  But, I do have some sewing to share.

After my last post, I thought I would share my Bullseye quilt to show what the raw-edge applique looks like after a few washings.


This quilt is about 15 years old now.  It's been washed lots of times.  This is the pattern called Bullseye based on the pattern in the book "Quilts From Aunt Amy" by Country Threads (Mary Tendall Etherington and Connie Tesene).  I didn't have the book or the pattern with me when I made this at a quilt retreat.  I didn't even have any circle templates.  I just cut the center out of a paper plate and made it up from there!  All of the fabrics I used have dots or circles of some kind on them, even the background fabrics.  


Here is a detail shot of two of the blocks.  You can see that the raw edges have softened and frayed some, but not as much as you might think.  Every once in a while, if it seems as if there are some big clumps of threads, I'll trim those down with some scissors.  But mostly the fraying doesn't bother me - I really like it!

Now that I think about it, I guess this quilt also qualifies as an improv quilt!  It is my favorite way to make a quilt.

Even my candy told me to do improv!

all four placemats
In September when I went to retreat in California, I took along this project.  I wanted to make some placemats, I needed something to demo bindings at the quilt show, and Katie wanted me to teach her something new,  So, I taught her how to do Debbie at A Quilter's Table's Cross-Cut quilt!  We had a lot of fun doing this process together.  I still want to do even more of this technique!

a truer representation of the fabric colors
I used royal blue and lime-y greens because I love those colors together.  

Katie's flimsie placemats

Katie decided to use brights with black, her fave combo.  She also cut her insert strips wider, about 1 1/2 inches, I think.  I cut mine at 1 inch.  

my inspiration page
The Tacoma Modern Quilt Guild had a color challenge this fall. due at the October meeting.  They had us choose a magazine page instead of a paint chip.  It was folded up and in an envelope, so we couldn't peek!  This page above was my choice, which I was happy about.

We had not-very-big size parameters and just had to do something that was related to the page, whether it was shapes or colors or any emotions the page evoked.

19" W x 17" H

Here is my challenge quilt.  Those books in the cases really spoke to me.  I'm not entirely pleased with this quilt - but I don't hate it either and it's DONE!.

the back of my inspiration page
the back of my quilt
I had to do the IKEA numbers fabric on the back!

If you want to see some of the other TMQG challenge quilt, click here.

For my birthday, my husband gave me a book I really, really wanted - Artful Improv by Cindy Grisdela.  I love her work - it really inspires me!
    

So, following her Building Blocks of Improv Design in the book, here is my first attempt at the Angled Stripes exercise.  I just picked the blues and greens that I liked, then added the hot pink for a zinger.

So, then I tried playing with various fabrics for the border.


the center is 10" W x 15" H
And you can see here that I tweaked my design some to be more interesting.

sorry for the terrible photo - it's so dark here
I think this is my final border choice.  I like the way the darker border color plays with the interior, making it more important.  Now I'm trying to decide on the final sizes for the sides.  I think they'll end up being 4 different sizes, just to make it more interesting.

Now I want to play with more of Cindy's exercises, particularly the curves!  I plan on doing more improv this coming year - it really is fun to do.  

I'm linking up with the Ad Hoc Improv Quilting.  Click here to see others' improv!

Sunday, April 19, 2015

Fun With My Sister

As I mentioned a few posts ago, my sister Sally recently came to visit.  She lives in the south part of Washington and we're only about 3 hours apart, but still don't get together as often as we'd like.

Sally said it was her vacation, and she wanted to PLAY!  As in - Sewing Fun!  So, that is what we did.  I set up my two little machines in the living room and we hauled the design wall down from the quilt studio.  And then we spread fabric and projects all over the place!


Wool work #1

She brought some fun things for me to see, like her wool projects she's been doing.  She's been playing with these for a while now, and finally got them to a "finish".

wool work #2

She was thinking of making these two pieces into pillows, but I suggested maybe wrapping them around a small canvas and making them wall art.  (No final decision was made at that time)  I love these!  They are so cheerful, and all those stitches make them very appealing to me.  Maybe I need to find some wool to play with!


Here is a quilt top that she has been doing.  Her color scheme is based on a tree by her front door.  It has the red-violet branches and the new leaves are a beautiful lime green.  This is quite different from what most people would do, but it's very "Sally" to me.  She's always loved those large floral print fabrics of the 1940's!  She just brought this to show me, and no progress was accomplished.


This is her "vintage baskets" quilt that she brought last year when she visited (see my post here).  She bought the border fabric last year and while she was here this time finally got it put on, with the addition of a little flange between the center and the border.  I just happened to have the right shade of turquoise for that!  Yay for stash!

detail of the border with flange


While Sally worked on her basket quilt, I worked on my liberated baskets.  I haven't touched these baskets in a while, but I did make a little progress.  I haven't decided yet just what I'm doing or where I'm going with these.  So poking along is just right for me at this stage.  I really like the basket in the upper right corner.  It looks "fizzy" with all those dots in the background!


I had made a bag for my sister, last year, I think. ( I can't find any photos of it anywhere to show you, and it came out really nice with batiks.  How could I forget to take a photo?!) She wanted to learn how to do that bag, so I helped her make this one.  You can find the tutorial for this bag called "Open Wide Zippered Pouch" here.  Sally used an old curtain from the thrift store that was bark cloth.  Very fun!  But it was also quite soft, so the use of interfacing was a necessity.  I think it came out cute!


She used a soft pink polka dot for the lining.  

I also made a bag (with cotton fabric), but neglected to use interfacing on it.  No photo, as it's doing a darn good imitation of a puddle!  (I think I learned my lesson)

about 18 to 20 inches square at this stage

This is a little wall hanging that Sally has in progress.  Never mind that it has been in progress for about 20 years!  Progress is still progress, right?  The fabrics date this work, but it's still cute and it will get finished.  Sally's planning on adding more borders, and still has the fabrics set aside with the top.  I do this all the time . . . do you?


Sally and I have always been slow about getting birthday and Christmas presents to each other in a timely manner.  It's a family trait, apparently.  Or so we're claiming anyway.  So, these are some of my Christmas presents from Sally.  They are kitchen towels that she added the decorative strip to.  The blue with the red strip is special to me, as that red fabric was a skirt that my Mom owned.  And, just so you know, I am actually using these!  They make me smile.


After I showed Sally my photos from my classes with Gwen Marston in March, she wanted to learn how to do a liberated star.  This is her first star!  She struggled to get the concept of how to trim those star points, but finally got it.  Isn't this cute?  I hope she'll make some more!

We had a blast while she was here.  My dear, dear husband cooked meals for us!  What a sweetheart he is!  I can't wait for her to come back to play some more.

I'm leaving for California in a few days to go to a quilt retreat with my California quilting buddies.  I can hardly wait!  I haven't been in two years, so we'll have a good catch-up while we sew up a storm.

Tuesday, September 16, 2014

Making Some Progress - and A Quilt!

What a slacker!  I can't believe it's been nearly a month since I posted!  I kept meaning to, but just never really got to it.  I composed lots of posts in my head, but never actually made it to the computer.  Hopefully I can break that trend.

Things are progressing around here!  The physical therapy that I'm doing is starting to pay off.  I'm finally off those darn crutches and am now using a cane.  (I should feel dapper, maybe, but I don't.)  And I am starting to wear a shoe - well, a sandal.  My ankle is still swollen and the shoe hurts, but I'm very tired of walking across parking lots and public restrooms in a mostly-bare foot.  (I still have to wear the brace)  The worst was the floor in the movie theatre - ick!  I'm starting to get around pretty well, and actually went to the grocery store by myself yesterday for the first time in 2 months!  Who knew that going to the grocery store would be something to celebrate?  hee hee!  It was a short trip, and I was pretty tired by the end, but I did it!  Just as an aside here - a cane and a shopping cart are an awkward combination, especially when the thing doesn't fit into one of those cute little carts.  The whole thing with this injury has been a lesson in patience, which I've never been known to have in abundance.  I think a little humility was thrown in there too.

"Vienna Melody"
53 x 74 inches

Here is a quilt that has actually been done for a while, but I don't think I've ever shown it here.  This was a charm square project.  I bought the charm squares and all the companion fabrics years ago, and finally got this finished.  The fabric was "Vienna Nights" by 3 Sisters for Moda, for those who might care.  Charm squares were a brand new thing then, just to give you an idea of how long ago it was!  

the quilting

It's not my favorite quilt.  It's lovely enough, and there's nothing wrong with it at all.  I just feel like it's got no "soul".  There was none of "me" put into this quilt, if you know what I mean.  No creativity. I made two quilts this way, and I learned my lesson.  (you'll get to see the other one as soon as I finish the binding!)  I don't think I'll ever make another quilt just from one line of fabric.  I guess I'm a scrap quilter at heart! 

I'm actually going to be trying to sell this quilt at the quilt show next month.  No one in the family is interested in it, I don't care, and maybe I can make some money to use towards a new computer.  (Mine is an XP, which is pretty much a dinosaur.)  I've never sold a quilt before.  Have you ever sold a quilt?   


"Leftover Lemons"
15 x 15 inches
I got my little "leftovers" quilt all quilted and bound now.  It feels good to have another finish!

I'm starting to put the finishing touches on my things for the quilt show.  Putting on bindings and labels, etc.  I have to have my quilts turned in by Oct. 1st, so the heat is on!

I thought I would share a little trick I use for putting on the binding:


After the binding is made, I do a fan fold with it.  Hopefully you can see what I mean from the photo.  I used to wind it onto a small ruler, but it always got all twisted up.  So I tried using the fan fold, which doesn't twist it at all.  My DH fan folds (instead of wrapping) all his electrical cords before he stores them, which gave me the idea.


Then, I take the fan folded binding and put it into a zip-lock baggie. I close the opening of the baggie except for a hole big enough to feed out the binding.  Then I drop the baggie onto the floor between my feet and start putting it on the quilt.  I've never had it hang up or twist on me, and it works a treat!  I don't know how others do it, but this is my way.  Anything that makes it easier to do is good to know.  Let me know if you try this and how it works for you.

It's been pretty warm here for the last few days, but I think that's just Indian Summer.  Leaves are starting to turn, and the nights are getting pretty chilly.  We were down in the 40's the other night.  The geese started flying north in mid-August this year, which to me seems really early.  Everything seems to be starting earlier this autumn, which to me says we just might be in for a bad winter this year.  I didn't seem to get enough summer this year, just because I couldn't get out and enjoy it so much after mid-July, when I had my accident. 

Hopefully I can post more often now.  I've got more to show you!