Showing posts with label food. Show all posts

Tuesday, May 19, 2020

Playing with Projects and a Flimsy

Well, I finally have a "first finish"!  This quilt top is now a flimsy. This is the Rail Fence pattern from Sujata Shah's book "Cultural Fusion Quilts".

Rail Fence quilt
56 inches square
I started this quilt way back in April of 2016.   You can read about it here.  This project got put on the back burner a few times since 2016, but I finally decided it's time was now and got it put together.  The i-sew-lation is at least good for getting some projects done.  I am very happy to get it to this stage.

one block to show you the fabrics, but each block is different.
It took me quite a while to decide what fabric I wanted to use for this quilt.  I finally decided on the indigo prints (shweshew) from DaGama Fabrics in South Africa because I love indigo and I love blue & white quilts too. I collected these fabrics over a span of time (maybe 10 years?).  I bought a few of them at a time at Pacific International Quilt Festival in Santa Clara every year.  I lived about 10 miles from where the Festival is held, so it was a yearly trip with my friends. ( I sure miss going).  The fabrics were fun to collect and to use.

 I used both the 3 Cats and 3 Leopards lines for the indigos and I used 1800's reproduction prints for the whites.  Quite the cultural fusion, eh?  I think I used up most all of my Da Gama fabrics making this.  You can see the logo that is printed on the backs of the fabrics in the pictures below.  There is also some of the fabric print showing, so you can see how different it is.

#1

#2

#3
This one is almost reversible!

#4

I made sure I got these photos because there wasn't any other way to preserve the logo otherwise, since I had to cut the fabric.  And I think it's pretty cool.


in process on the "design floor"
This quilt was a little math challenge for me, as the DaGama fabrics are only 35 inches wide, not 42.  I had to do math and shrink the blocks to 14 inches instead of 16 inches.  But it worked out really well!

There is lots of ways to lay out these blocks, but I didn't even play with them.  I knew this was the layout that appealed to me for these colors.  Maybe another time I'd do a different layout.  I'm so happy to finally have this done!  Now I need to decide if I'm quilting it myself or sending it out to the LA quilter.


This is what 50 pounds of flour looks like!  We were never able to find any flour in the grocery stores, because of the pandemic panic buying and hoarding, so we ended up ordering the flour directly from King Arthur Flour.  My husband has made almost all of the bread we use for the last 2 years, as well as hot dog and hamburger buns, biscuits etc.  Finding yeast was another adventure.  But now we're set for a while! Yay!


I was in the mood for finishing some things after I cleaned up the quilt studio and found a bunch of half-done projects. So, this was some blocks from an exchange I was in.  These blocks are so pastel they don't fit color-wise with the other blocks, so I decided they needed to be a table runner.  The 3 blocks made it just the right size.  I can't tell you how long this was waiting to be put together.  Kinda silly, right? My working theory is that no project is done before it's time - it needs to age properly!  Like a fine wine.

12 inch Urban Chicken blocks

Rather then basting and quilting the baby quilts that I'm supposed to working on, I started working on another project that I had been stalling on.  As in, I had the pattern and some fabric pieces were cut.  But I was inspired when I saw someone's quilt they were working on, and decided no time like the present for working on this.  Maybe it's my quarantine quilt?

Anywho, these are Urban Chicken blocks.  I fell in love with this pattern when the Tacoma Modern Quilt Guild used this block for the Block of the Month one time.  Here is the pattern from Cath at Wombat Quilts.  It's a very easy block to make and fun for using up scraps.  Cath shows this quilt done in a couple of different color schemes here and here, and I like them both.  I haven't decided if I'm using a limited color scheme (blues, greens and maybe purple) or if I'm going to go with rainbow colors.  I think rainbow, as I've wanted to do a rainbow quilt for a few years now.  Anyway, these 12 inch blocks are a lot of fun to make.  The chicken "beaks" are done with a wonky improv process and are so easy to do.  So easy that mine aren't being quite as wonky as I'd like them to be!  I have decided that the blue block needed more contrast in it.  It reads all the same color.  Lesson learned, I hope!


When I was trying to photo the blocks, the Quilt Inspector (Shade) came to see if he approved them.


Here he's complaining at me that they're not snuggle-worthy yet.


I think he got over it!  Now he's just being a little grumpy. 


Here is what I call the Washington state flower, as there are millions and trillions of these around here.  Whole pastures just full of them!  


And I found, when I wandered around the yard, that my trilliums are blooming and starting to spread!   The deer don't come through our yard anymore due to a new house and fence in the neighborhood and I miss seeing them but the trillium are happy about that.  The deer were nibbling them down to nothing. Sadly, they're also not eating the ivy that wants to take over everything on one side of our yard. Oh well.  I had never seen trillium before we moved to the Pacific Northwest.

It's been almost 70 days that we've been staying home.  Well, I have. My husband and my son keep going to the store for necessities, and I'm so glad they're going.  They both say that those trips are pretty stressful, even though most everyone is being so careful to do the social distance thing.  I had to take my son to the dentist last week, but it wasn't bad.  They were doing emergency appointments only, so the waiting room was empty.  I had to go get a blood draw yesterday and it was also empty.  And I wear my mask all the time I'm out.  For Mother's Day we all went for a drive.  I was getting antsy and ready to see something else.  So we just drove around in the country and never stopped anywhere.  It was a nice trip, but it was surprising how many people were out at the river!  Because we were having our first heat wave of the year.  

Then DH and I had to go for a drive the other night.  The battery in my car pooped out (after sitting in the driveway for 2 months!) and after 2 days of not starting very well (but still sitting in the driveway), we went for another drive to get it charged up good.  So another nice diversion that was a no-contact trip.  It's helping me to not be too antsy.  I miss going to guild meetings and seeing my friends!  

How are you doing?  Are you going out?  Are you wearing a mask?  I was so glad for the mask yesterday because the cottonwood trees are now spewing their "cotton" everywhere and it really aggravates my allergies.  Having the mask on really helps with the allergies.  Who knew?

That's all the news for now.  I hope everyone is staying safe and healthy!
Happy quilting!

Wednesday, March 01, 2017

AHIQ and Random Stuff

It's time for the monthly Ad Hoc Improv Quilt challenge link-up and I'll be linking up with Kaja at Sew Slowly.  I missed last month as I was in Las Vegas, and I don't have a lot to show this time, but I will share what I do have.


I was inspired, around Valentine's Day, to make some wonky hearts!  A "squirrel" project.  You know what  I mean.... an-out-of-the-blue, wild-hair hankering to make some little hearts.  I decided to go with bright solids with text and low-volume prints.  I do so love that combo!  Well, I'm a little rusty at making wonky hearts and the first two hearts didn't quite make the cut, but I kept going and the hearts  have improved.  I'm starting with 5 inch squares of the solid color and when I'm done, I'll cut all the hearts down to a common size.  I think.  I have no plan for these, I'm just playing and having fun!  I used Lazy Gal Tonya's tutorial for the wonky hearts.  You can see it here.


The other improv project was also hearts!  I made some blocks for the Block Lotto drawing in January.  Improv "slabs" were the basis for the hearts. The pattern is here. They're not the most improv-looking, to me.  If I were to make more, I think I'd get a little crazier.  *grin*  Sadly, I didn't win the Lotto, but I had fun making the heart blocks.

and even more hearts!
DS and I were going to bake Valentine's Day cookies, but as we were preheating the oven, we heard some strange noises coming from it.  The electric element was on fire!  It was like arc welding going on in there!  Yikes!!  I turned off the oven, but the fire was kept going.  So, not knowing what else to do, I called 911.  The nice firemen came and unplugged the oven/stove and told me not to use it!  Fortunately the cookie dough was still in the fridge, so we didn't lose it. Not having the stove top or the oven made making meals a little challenging until the repairman got there.  We went out to dinner a couple of times and BBQ'ed and microwaved.

In the end, we got a new element installed in the oven and we finally got our cookies baked about 10 days late.  Better late than never... and they were still yummy!


These Japanese X and Plus blocks were the January Block of the Month for the Tacoma Modern Quilt Guild.  We used this tutorial at Christine's Color Connection blog.  They were easy and they came out the right size with no problems!  You can see the finished quilt here.  (That committee is some fast sewists!)

Boy blocks

And these string blocks were the February BOM.  For these blocks we used the Scrappy Strings tutorial from Cluck Cluck Sew.  We adapted the pattern by using a few more strips than called for to end up with 10 inch blocks.

Girl blocks
Most of our Blocks of the Month go to the charity quilt committee to be made into quilts to give away.  This month the call was for blocks for kids' quilts in particular.  I think these came out so cute!


My other quilt guild makes quilts for a local hospital's babies.  Most of them are small to be used for preemies and also early demise - the  little ones that don't make it.  This is one I made from hand-me-down scraps.  I've gotten it quilted and found a fabric for the binding....now I just have to do it!   Hopefully by the guild meeting on Friday.


Remember this one?  I started this in January 2015 and it was meant to be a long term project.  You can see the beginnings here.  I've had the blocks done for a while (see them here) and I'm finally starting to sew them together.  Two rows done!  Moving right along....    I want to have this finished for the quilt show in September, so I can't stall too long on this.  But I have a 3 day workshop coming up the middle of this month and that has me kind of distracted. 


Another scrap project.....some badly needed new hot pads.  I even used scrap/leftover bindings.


And, my giggle for the week, a Star Wars Tie-Fighter Tie!  I love it!

Tomorrow I'm going to Sew Expo with some friends.  That will be fun!  I haven't gone for a few years.  It's so massive that it's sometimes hard to find what I want, but I have fun looking. It's not as big as Pacific International Quilt Festival that I used to go to in California, but still big enough to do some damage.  $$$!  Let the shopping begin!

Saturday, March 26, 2016

Long Time, No See

No, I didn't really drop off the face of the earth.  Just . . . . Life.  I've been busy, I've been lazy, I've been "under the weather".  You know . . . "things".  I know you all know how you can just get busy and forget the blog.  Not that I forgot, I just never could get around to actually writing a blog post.

the first camellia of the year
So, what have I been busy with?  I taught two bag classes,  I took a class on Liberated Medallion quilts from Gwen Marston.  I got sick.  I'm sure there were other things in there as well.

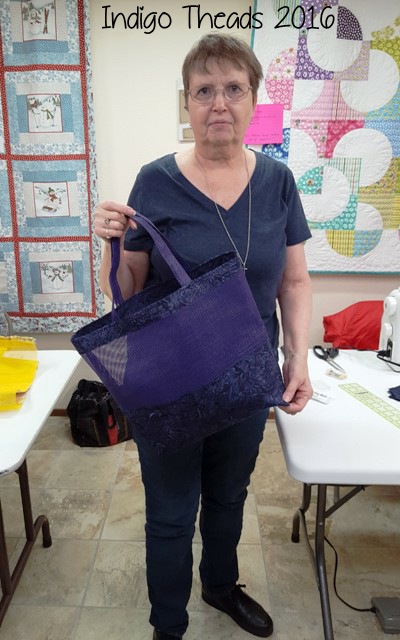
First, I taught a tote bag class at the local quilt shop "Cow Lick Quilts".  I had a lot of fun, and I think my students did too.  They were all successful and all the bags came out really cute.   Here are some photos from the first class:

L. and her bag made with batiks

J. and her bag made with selvage squares

C. and both her bag (on the left) and the other C.'s bag too

Then, to meet the demand of students that couldn't make the first class, I taught another class a few weeks later.  Unfortunately, I forgot my cell phone that day and so I didn't get any photos.  :(


But J. made another bag and I got a photo of that.  She used an orphan block that is part of an orphan block challenge for the Tacoma Modern Quilt Guild.  I love how this one came out!

I had so much fun at my class with Gwen Marston,  We were at Quilted Strait over in Port Gamble again, and their facility is such a great place to sew.  If you want to see some photos of the class, check out Nifty Quilter's blog post about the class.  Nifty sat right across the table from me.  And another table over was Rene of Rene Creates blog.  We all had a great time with Gwen, as usual.  I will do another post, with photos, about the class, so I won't say any more right now.  Yes, you'll have to wait.  Sorry.

The only downside to the class with Gwen is that I got sick right after I got home.  I think the Spring allergies (everything was starting to bloom and the trees were spewing whatever it is they spew) probably caused a sinus infection, which then caused a tooth to flare up.  I ended up with the tooth being pulled and I was on 2 antibiotics for two weeks.  And now I'm continuing one of the antibiotics for another week to get rid of the last of the infection from the tooth.  I'm almost done with that one.  It hasn't been much fun, as I'm sure you can imagine.  And the worst part of all of this is that I haven't felt well enough to work on the quilt I was doing in the class with Gwen.  I've lost my momentum.  I hope to get back to it soon.  I'm still trying to catch up on everything I got behind on by being sick.  

I'm now the Block of the Month chairperson for the Tacoma Modern Quilt Guild.  I found a block I really liked last month, but ended up having to write the tutorial for it, since we changing the size of the block.  The block is based on the 3 Dimensional block by Zen Chic.  You can see Zen Chic's video here.
Here is one of my blocks:


And here is the link to the tutorial I wrote.  If you make the block, I'd love to see photos.  I still want to use this block to make a quilt for me!

At the February meeting of the Tacoma Modern Quilt Guild, we did a Make and Take that was some cute pinsies!  These are great for marking your blocks or rows when assembling a quilt.  And they were very easy to do too.

The cute pincushion is one my sister made for me a few years ago, using wool and a found vintage pitcher.

This week I tried something new and joined Instagram.  It will be another adventure!  If you want to find me there, I'm posting as indigo_threads.  

DS and I had some fun this week, dyeing eggs and making Spring cookies.


They're very yummy as well as very cute.  And lots of fun to decorate!

Sadly, the cookies are almost all gone.

Be sure to check out Kelly's post over at Pinkadot Quilts about Simon and Garfunkel.  I also found that video, and strangely, I love Disturbed's version of the song.  It's quite different from S & G, but it's a powerful version.  (Did you know that there are a LOT of different covers of The Sound of Silence?  I counted 35 on Wikipedia.   I didn't know that!)

Happy quilting!
Sharon

Sunday, June 28, 2015

Happy Summer!

Summer has finally come to Western Washington - with a vengeance!  It has been blazing hot here for days, and it's expected to be like this all week.  Today is very nice, the high was only 85* and mostly cloudy, which was nice after yesterday being 92* and blazing sun.  It's supposed to heat up all week culminating in 96* on Thursday.  Yikes!  We don't have A/C, so we suffer when it gets that hot.  And we usually only get about 4 or 5 days of truly hot, so this is really unusual for us.  Plus we're having a drought as well, so everything is brown and crispy.  Not my favorite weather!

So, thanks to the heat, I haven't been getting much sewing done,  My sewing room is upstairs and on the east side of the house, which means it heats up early and then stays too warm.  A week ago, my guild had a workshop on Bargello, so I did some sewing there.  And then Friday I sewed at a friend's house, where I finished my Bargello pieces that I had started.

second piece

I'd never tried Bargello before, so I wanted to give it a shot.  The concept isn't hard if you're used to strip piecing, but it can be confusing and achieving a nice curve isn't as easy as I thought.

first piece

You can see that my first try is kind of awkward compared to the second one.  I used all batiks for this project, because I thought they would work well for this.  I like the variations in colors in the batiks - I think that makes it more interesting.  These two pieces are each about 18 inches square. I'm going to be turning these pieces into a tote bag - at least that's my plan at the moment!

"Jungle Cat"
Our local art gallery, where my DH sells some of his pottery, is having an Artist Trading Card sale again this year, to raise funds.  So DH made some pottery ATCs as well as some paper ones.  I, of course, made some fabric ones.  Which only makes sense, since I not really good at drawing or painting, like some of the other artists.  But my ATCs seem to be popular.  The last time I checked, they all had bids on them!

"Time Cat"
These little pieces finish at 2.5 x 3.5 inches.  Not a big investment in time or supplies.  But lots of fun to make.  I fused the Laurel Burch cats onto the background fabrics, and then added the fun buttons and beads.

"Untitled"
This last one was made with my smallest hand-dyed and Cherrywood fabric scraps, which were left over from this quilt.  It has kind of an Amish vibe to me, but I had to add those beads just for fun and to make it a little more "artsy".


A week or so ago DH and I got new cellphones.  Our 4 year old phones were dinosaurs, and were starting to die.  So we got a new plan (I can text now!) and nifty Galaxy 6 phones.  These phones have the best camera on them!  I've been having lots of fun taking pix.  The photo above is a barn about 1/2 mile from my house.  I love this barn, and I think I got an interesting photo of it.


This photo was taken directly across the road from the barn. facing east.  You can't tell from this photo too well, but that is Mt. Rainier in the center (where it looks like clouds).


Same photo, just super zoomed in.  That is the mountain, with the clouds hiding the top half of it.  With this warm, clear weather, we're getting some awesome views of the mountain.  Finding a good place to stop the car to get a photo is the hard part!

Dear Son made some "Midsummer" cookies this week, and we finally got them frosted and decorated today.  Sorry this photo is a little fuzzy.

fireworks, flowers, ice cream cones, cats (and a nudist in the upper right corner)!


a tree and a tent, airplane, music note and more fireworks & flowers

the last four cookies
The hardest part is not gobbling them all down immediately.  We love these cookies, and decided they're not just for Christmas.  *grin*


Dunkel says "Happy quilting"!

Sunday, January 13, 2013

Making Vanilla

Here I go with my first tutorial, and wouldn't you know it, it has nothing to do with quilting!

Did you know you can make your own vanilla extract?  And it's not only less expensive than the extract you can buy in the store, but it's much tastier.  And, best of all, it's super easy to do!

I've been making my own vanilla for about 30 years now!  Back in the early 1980's my mother sent me a bottle with a vanilla bean inside it and the recipe to make my own vanilla on the label.  It was so easy and so good, I've just kept on doing it.  I've even made vanilla in fancy bottles and given it to friends and family for Christmas presents.

You will need:
* a vanilla bean, which is available in the spice section of your local grocery store, although I found it for less money at Amazon.com

* sugar

* vodka.  The vodka doesn't have to be expensive.  Matter of fact, I've only ever used the cheap store brand.  And none of those fancy flavors.  You want plain vodka for this.

* A bottle to make the extract in.  You could use the bottle that the vanilla bean comes in, or you could find a fancy bottle.  It just needs to hold 5 or 6 ounces and have a tightly-closing lid or cork.


Take the bean out and break it in 3 places, then place it in the bottle you're using to make the extract.  My bean is broken more than that because I've used it a number of times before. You can actually use it to make extract about 4 times before it's exhausted.


Then, you need to add 1/3 teaspoon of sugar.


Next, add 3 ounces of the vodka.


Put the lid on tightly and shake the bottle.  That's all there is to it.  Easy peasy!  See all the little specks of vanilla floating in there?  That's what makes it so yummy!

You'll need to shake the bottle at least once a day, and let the mixture steep for one month.   As it steeps, it will darken in color until it looks just like the extract you've always bought at the store.  I always mark on my calendar when the vanilla will be ready.

When your vanilla is ready, remove the bean from the extract, let it dry out for a day or two, then store it in an airtight bottle or ziplock baggie until it's time to make more vanilla.  (Don't forget - next time you use the bean, you'll have to break it in 3 places again, until you eventually end up with just little sticks.)

Then, make yourself something really yummy with your new vanilla!

I did a little math, to see how inexpensive this can be:

I found 5 Madagascar vanilla beans for $5.96 on Amazon (much cheaper than the $16 for one bean at Safeway!).  That works out to $1.20 for one bean.  You can use each bean about 4 times, so that would be 30 cents for one bottle of extract.  I found Seagrams Vodka at Safeway for $8.99 for a 750 ml bottle, costing 35 cents per ounce. There are about 8 bottles of extract per bottle of vodka, making it $1.05 for each. I'm not even going to try to estimate what 1/3 teaspoon of sugar would cost, because it is so negligible.  

Whew!  Are you still with me?  OK, therefore, it would cost  you $1.35 for a 3 ounce bottle of pure vanilla extract if you make it yourself.  In comparison McCormick Pure Vanilla Extract is $4.99 for only one ounce at Safeway.

So you can see what a savings making your own pure vanilla extract can be.  The added benefit is that your homemade extract is so much yummier than the store-bought version and you know exactly what is in it.  And you can feel smug knowing that you're eating better and spending less money to do it, which is always a good thing.  *grin*

Happy eating!