Wednesday, December 25, 2013

Merry Christmas!


Wishing everyone a jolly holiday!

Monday, December 09, 2013

This & That

I know . . . long time, no see.  Again.  I've been a bad blogger this year.  I guess I need to step up my game here.  I keep meaning to post, but it just never quite happens.  I hope next year I'll do better.


Here is my latest "creation".  I made myself a new apron since I was hostess for Thanksgiving this year.  I used batiks, and it's a two-sided apron.  Pattern by Mary Mulari - The Church Ladies Apron.  It was pretty easy to do, but I simplified it too.

close up of fabric
I made the neck piece simpler and also made the apron ties skinnier and only used one fabric for them.

side 2
I didn't add the pockets either.  I never use the pockets on an apron.  They just seem to catch crumbs and things.  Who's got time to put their hands in the pockets when they're cooking anyway?  I've always been mystified about pockets on aprons.  Besides, that leaves more fabric for me to play with another time!

side 2 closeup

We had a wonderful Thanksgiving.  Everyone in the family was here, except for my niece who's in graduate school in Vermont.  My sister and nephew came, and that was a lot of fun.  It was fun to see the cousins talking and having fun together.


My sister brought me a gift when she came.  Well, actually she brought all my birthday presents as this was the first time we'd seen each other since my birthday.  But this one was very special to me.  She brought me my late mother's recipe boxes.  The one on the right was her original one.  I "enhanced" it when I was in high school by decoupaging some cut-outs from a magazine or something.  It doesn't look very good and I was always sorry I mucked it up.  The one on the left was one DH and I made for her a number of years ago.  We bought the box, he stained it and made the stencils and I stenciled it.  I think I'm going to ditch my old, sad plastic recipe boxes and start using my mom's.  I just need to sort through her recipes that are still in them.


This was a 'make & take' project from my LQS, Heavenly Quilts and Fabrics last month.  Now I need to get it done in time for Christmas!  My friend K in CA did blanket-stitch stitching around all the appliques for me (not included in this photo), and now I need to quilt and bind it, and then sew buttons on for the eyes and mouth.  We'll see if I can actually get it done in time for this year.


Last week I took a class at Heavenly Quilts.  Lisa taught us the braid quilt.  This is what I have so far.  I think I need 2 more braids to make a lap quilt the right size.  I have lots of strips cut and ready to go.  My guild gives the lap quilts to a couple of the local assisted living facilities.


At the guild's Christmas party last Friday, we drew for our next year's challenge.  The Ugly Fabric Challenge.  I think these fabrics are waaaay beyond ugly - they're in the "Hideous" category!  We had to got to pick a stapled-shut brown paper sack.  Then we had to write our name on the back of the index card that had swatches of the fabrics stapled to it, so that when it's done, people can tell which fabrics we were working with.  The finished quilts will be shown with these swatches at the quilt show.  Each fabric is about a fat quarter in size, and we only have to use a recognizable piece.  How big do you think that would be?  I'm thinking an inch square should do it.  *grin*  The challenge is due in July.  

I have no idea what I'll be doing with these, but I was assured that over-dying or using the wrong side of the fabric is allowed, so that definitely opens up more possibilities!  These fabrics just make me shudder!  Ewww!  The sad part is, I recognize that middle fabric from (I think) the 80's.  I think I may have even had some of it.  I do find it the least offensive of the three.  Just saying . . .

We've been having very cold weather for here.  Two nights ago was our coldest, when we got down to 14 degrees!   Brrr!  I spent all weekend inside, trying to stay warm.  We've been very dry too.  The static electricity is getting pretty wild.  We've had no ice, except in the pond, which is quite frozen.  Most days there hasn't even been any frost on the cars.  It's too dry!  So the power has never gone out.  Yay!  The furnace has been working overtime.  We even had sun for a few days, which was nice.  We're clouded over now, so it's starting to warm up. That's a relative term.  We made it up to 32*F today.  And  now there's a  possibility of  snow.  

It's been so much fun seeing other bloggers' homes all decorated for the holidays.  Our tiny tree is up and decorated, and DH put some lights on the front of the house.  I still need to put up my Christmas wall quilts.  And that's all that's going on.  I guess we're kind of humbug here - the kids are grown up and it just seems like too much work anymore.  I'd rather be sewing!  I love getting the decorations out, but I really hate putting them away.  So I don't do it anymore.  But I LOVE seeing how other's have decorated and admire them for doing it!  I have to say, my Christmas quilts do make me happy.  And that's enough now.

Tuesday, November 19, 2013

Another Random Post, I'm Afraid

First I want to say "Thank You" to everyone who left me birthday wishes!  I had a great day and it turned into a great week!  Lots of phone conversations with family and friends, and a few birthday lunches as well. I had loads of fun!

I've been busy with all kinds of things lately, including getting some sewing done.


Today I finished two new place mats.  I still have two more that I need to sew the binding down on.  I went to my LQS for the Tuesday Sew-in and got to visit with other quilters while I worked, which made it lots more fun.  This was a free pattern for Amy Ellis' Graphic Patchwork Table runner that I got from Quilting Daily here.  I got started on it and then thought "But I don't have a table that long!".  So I made the runner into the place mats, which I needed.  I like them!  The tan fabrics in there show up a lot more in the photo than they do in Real Life.

Last Friday my quilt guild had a workshop and Donna taught us how to do Seminole Piecing.  It's been many years since I did that technique!  She gave us directions for making the strata ahead of time, and no idea of how we would use them.  I would have made some different color choices had I known.  Oh well, it's all good.

my first three pieces, in order from the top

my next two pieces, with my color inspiration fabric at the top

All of the pieces with the fabric.

Now that they are done (I still have one more to finish), I don't like them with the fabric I used to decide colors.  The Seminole Piecing colors are so bright and strong that they overwhelm the fabric.  So, now I need Plan B!  It was fun to re-discover Seminole Piecing.  Back when I first did it, I did it all with scissors - no rotary cutters then!  This is muuuch easier.


Went to Hobby Lobby a few weeks ago and did a little damage.  But only a little!  I got 6 yards of fabric for only $30!  Everything I got was on sale for $5 a yard.  Whoo hoo!  No plans for this, except the two pieces on the left will become a pillowcase for me.


Recently, I went to see P., the lady that is the keeper of the fabric for my guild's charity quilts.  She was going to get rid of a lot of fabric that she didn't like for one reason or another.  I opened my big mouth and ended up with a pretty good haul.  Above are two pieces of older tropical prints.  The red one is an Alexander Henry print.


And here are 3 pieces of vintage fabrics.  I don't know yet what I will do with these, but I couldn't pass them up.  The bottom piece is feedsack.


I said to her "Oooo, you have pindots!", so now I have pindots!  Those orange-y ones at the bottom of the stack are really true red.  The camera just insisted on seeing them as orange.


And here is a big pile of men's shirt-type fabrics.  P. didn't want them, and I have a quilt on my Wish List to do that uses that kind of fabric.  You can see it on my Pinterest page here.  I'll bet I have enough here to do almost that whole quilt!


Lastly, here is a String X quilt that I got put together lately.  I was tired of working on these string blocks, and tired of the fabrics I was using.  I've used them quite a bit in other string blocks the last few years.  And I figured out that I had enough blocks to make a charity quilt the size that my guild uses.  Well, it needs a little more to be the exactly the right size, and to me it seems to need a border.  But everything I tried with it didn't really work.  There are so many colors in the blocks that no one color is the right one.  And, hard to tell from the photo, but most of the fabrics are bright.  It's hard to get a good photo when it's dark and gloomy here.  Now I'm considering a pieced border, as I have more squares of the blue print background fabric.  But I'm not sure.  I'm open to suggestions!

Have a quilty week!

Monday, November 11, 2013

Happy Birthday . . .

to me!  Today is the big day. I'll be celebrating rather low key - just going to see the movie "Gravity" with my DH The Potter and DS The Kid, and then we're going out to dinner.  Should be a fun day!


Here is my big birthday gift - a new Brother sewing machine!  About a month ago, I heard from a friend about a Really Good Deal on Costco, so I had to get it. (Just checked out Costco.com and it seems that this machine is no longer available!)  It only weighs 13.5 pounds.  It's so easy to more around, and easy to use.  I even figured out the auto needle threader!

The other gift I received is an art quilt!  I found this at the local art gallery that The Potter has his pottery at, and I fell in love with it.  My DH loves it when I do the shopping. *grin*

"A Favorite Path" by Bertha Moore
12 in wide by 14.5 in high
Bertha's favorite subjects for her quilts are landscapes and wildlife.  She is a local lady and a native Washingtonian.

I am as fascinated by the techniques Bertha used as I am by the actual image.


A detail shot.


Here I'm showing how most of the image is constructed and quilted on a piece of black felt, separate from the main body of the quilt. 


The back, showing the stitching Bertha did to quilt and to join the felt piece to the main body.


Here's the new home for the art quilt - in my upstairs hallway so I see it every time I go up or down stairs.  It fits right next to the piece I made - a silver-embossed birch leaf.  I think they suit each other nicely.

sneak peek!
Got my latest quilt back from my long-armer Shari the other day.  Gotta get the binding done on this before I show you any more!

Thursday, October 31, 2013

Happy Halloween!

ceramic pumpkins by my DH, The Potter

Wishing you a Halloween that's all treats, no tricks!


Tuesday, October 29, 2013

Blogger's Quilt Festival Fall 2013 - Whisper

I love this time of year!  Autumn is in it's full glory here in Western Washington, the weather is turning cooler and it's time for the best quilt show of the year - Blogger's Quilt Festival!  

The festival is open to everyone, and there are so many beautiful quilts to admire and be inspired by, not to mention, "meeting" new-to-me bloggers!  If this is your first time visiting Indigo Threads, welcome!  I hope you'll come back often.  And if you're familiar with my little blog, welcome back!

"Whisper" 69 1/2 x 85 inches - all ready to snuggle up with!

Here is my entry in the Scrappy Quilt category.  This is my version of a "low volume" quilt.  I was intrigued by the idea, as so many of my quilts are done in bright and/or intense colors.  

some of the awesome quilting my LA'er did

I was amazed that I made this all from my stash.  Who knew I had so many light fabrics??  *grin*  I used true scraps, fat quarters, and I also cut  pieces from some yardage as well. 


There are new fabrics and old fabrics, pastels, novelties, 30's reproductions, conversationals, shirtings, polka dots (of course!) and even some of my hand-dyed fabrics.  And lots of cat fabrics too!


You name it, if it was white, off-white, light tan or pastel it went in here.


The only fabrics I bought specifically for this quilt are the border and backing fabrics.


These were my first two blocks.  I got the pattern from the book "Successful Scrap Quilts" by Margaret Rolfe.  These are very easy blocks - just cut strips 2 1/2 by 4 1/2 inches.  And no matching of any seams when things get sewn together!  Whee!  Just easy-peasy.

I started this quilt almost a year ago, here.  I've shown, on the blog, some of the progress on this quilt over the last year.  I actually had this finished at the beginning of the month so it could go in our local quilt show, but I was wanted to show the big finish on the blog for the first time for the BQF.

the back of "Whisper"

The quilting can be seen in this photo.  I asked my long-armer, Shari, to do free-hand hearts and flowers, since this is such a "girlie" quilt.  I love her quilting on this - it's perfect!


Here is more of an all-over shot of the quilt.  My poor DH is struggling to hold it up, as it's so big!  It's definitely big enough to wrap up in.

I can't wait to start reading my book and snuggling up with "Whisper".  

Follow this link to see my other entry into the Blogger's Quilt Festival, The Halloween Quilt, in the Bed Quilt category.

If you haven't had the chance yet, hop on over to the Blogger's Quilt Festival and take a look at all the wonderful quilts to be seen!

Blogger's Quilt Festival Fall 2013 - The Halloween Quilt

Time for ghosts and goblins to be out and about in the neighborhood.  Are you ready?


And it's time for the Blogger's Quilt Festival too!  Which one are you more excited about?  In spite of Halloween being my favorite holiday, I'd have to say I'm pretty darn excited about the BQF! 

The Halloween Quilt - Front
69 x 84 inches
Here is my entry into the festival in the Bed Quilt category.  This is The Halloween Quilt, made with lots and lots of Halloween fabrics. Not a very original or catchy name, but it works. 

 I actually finished this quilt last fall, but I've never shown the finished quilt on the blog before.  It is so big that I couldn't find a way to photograph the whole thing.  (the above photo was taken while it was hanging at the county fair this year)  It's been on my bed for the entire month of October, getting me in the proper mood for this fun holiday - one of my favorites!


The pattern I used is Scrappy Trips by Bonnie Hunter over at Quiltville.  I know a lot of people have made Scrappy Trip quilts over the past year - it seemed to be a Big Thing on the quilting blogs!  This is my third quilt done in this pattern since I discovered Quiltville about 8 years ago, and it will probably not be my last!  It's such a fun, easy pattern.


I deviated from the original pattern a little bit by using 3 inch cut strips instead of 2 1/2 inch.  I wanted to really show off the novelty fabrics I was using, and didn't want them cut so small that you couldn't see some of the details. That size strip makes a 15 inch quilt block, which means the quilt is made a little faster. 


But I didn't use only novelty fabrics either.  There are plaids, dots, hand-dyes tone-on-tone and other fabrics.  Whatever looked like it would work.  I had a hard time stopping buying Halloween fabrics!  Mind you, I started with a pretty good stash of Halloween novelties, since it's one of my favorite holidays.  I still have enough for 3 or 4 more quilts!  *grin*

When I was ready to set the blocks together, I laid them out on the living room floor.  My husband and son decided on the zigzag layout, and which block went where.  It was fun to have them help me!


The Halloween Quilt - Back
This quilt decided it wanted to be two-sided.  I added lots of Halloween panels that I've collected over the years.  I can't decide which side I love more - they're both fun.


Here is a picture of the back when I was just getting started on constructing it.  I laid the quilt top down on the living room floor, then started adding the panels and chunks of fabrics on top of it.  I figured that would be the most direct way of knowing when it was big enough. LOL  You can see parts of the blocks on the front peeking through the panels.  I think making the back took me longer than making the front!


I added not just panels, but chunks and pieces of Halloween fabrics, and leftover bits from the front blocks as well.  Nothing went to waste.


Some of the panels I cut up and added bits of fabric around the smaller panels, to make things more interesting.  It was a lot of fun.  Like doing a gigantic jigsaw puzzle.


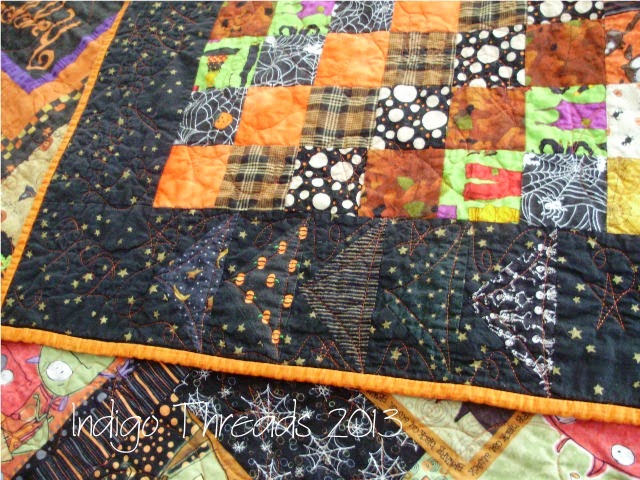
I didn't have quite enough border fabric, so I pieced flying geese in the corners.  I think it added more interest too, although it's subtle.


My long-arm quilter quilted all kinds of fun things on this quilt, but most of them don't show up well enough for a photo.  She added witches riding brooms, moons, stars etc. and then quilted Halloween words around the border.  Things like "haunted house", "spells", "boo", and so on, all the way around.  It's lots of fun to play I Spy with the quilting!

This is one of my favorite quilts.  I sure was looking forward to using it for the month of October.  I hope you've enjoyed seeing it too!

Follow this link to see my second entry into the Blogger's Quilt Festival, Whisper, in the Scrappy Quilt category.

I hope you'll take some time and cruise around the rest of the BQF and be awed and inspired by all the rest of the quilts!

Monday, October 21, 2013

Missing Blogger Found Alive!

Wow, that was a much longer bloggy break than I had planned on.  After such a long time,  I'm feeling a little out of practice with blogging.  So, I'll just jump in and get past that awkward feeling!

I did get my Quilt of Valor finished in time for the Quilt Show.


I started with this panel, way back in June.  Then I stalled and stalled, until I found out it needed to be a finished quilt, not just a top, for the quilt show.  I pretty much panicked at that point.

Okay, in the interest of not boring you, Dear Reader, nor myself, I'm giving you the condensed version.

First try at the star - I didn't like the way the white "bled" into the border.

I added an inner border to contain those fierce birds, then starting adding the blocks I received from Magpie Sue over at The Magpie's Nest blog.  I made a false start when it came to the stars in the corners, but eventually got them right.

Final star - used some older fabric and it looks great.
I went to a quilt show and found a Q.O.V. fabric that was perfect for the outer borders and binding.  I talked to Bridget at my LQS, who has a long-arm machine.  I knew I couldn't do a decent job on this (as it would be my first try on a long arm), so Bridget volunteered to donate her time and talent to quilt this for me (Thank you, Bridget!!).

Finished!
I got it back from her on Tuesday at 9 p.m. and had until Thursday at 10 a.m. to get the binding done.  And I got it done in time!  Yay!  I think our collaboration worked really well, Sue - Thanks!


When I went to the quilt show I mentioned above (where I found the Q.O.V. border fabric), I also bought myself a new wallet.  Isn't it cute??
The creator's card is visible in this shot.

Lots of storage room in here!


And look at all these cute selvages!  I haven't had a new wallet in years, and I'm loving this one!


I participated in a block exchange with my friends in California.  They were doing blocks for The Future's So Bright quilt that Crazy Mom Quilts did.  Here are my blocks.  We made 8 each of Block A (the double 4 patch) in two color schemes, and ditto for the Block B blocks.  Using brights, of course!  I missed the exchange date (didn't read the calendar correctly . . . too focused on the quilt show), but they should be there by now.  And the blocks I'll receive will be here soon.  This is gonna be a fun quilt to do. I should get busy making more blocks for the quilt, as I certainly have lots of bright fabrics to play with.  But I want to play with some other things for awhile first.