Thursday, January 27, 2011

Plaidness


As you can see, there is plaidness happening in my quilt studio!  I got a bunch of wonky 9-patches done to go along with the plaid kitties, and now I'm working on wonky stars.  I'm kind of stalled at the moment, as I was finishing the name banner for my granddaughter.  More on that in a moment. . . .

I'm really not sure quite where I'm going with this piece.  I'm trying not to stress about it, but it's trying to creep in on me.  I don't know why. . . .this is supposed to be fun.  But this working improvisationally is actually kind of hard to do.  Fun, but also hard. 

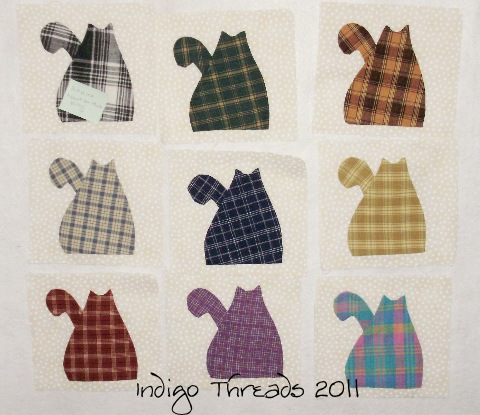
If you remember from my previous post, I'll be adding the names of all my kitties to this quilt using Tonya's Unruly Letters.  I considered using a different plaid for each cat's name, except for 2 things.  One, the plaids are all woven and many are the loosely-woven homespuns, so they'll be difficult to work with for the little fiddly bits.  And two, I think that the plaid will be too difficult to read.  So, I looked for some fabric to go with this quilt. 

What goes with every color of plaid??  I finally found a fabric that I think works.  I've had it in my stash for years, waiting for the right project, and I love it.  It's a small check in purple with tiny different-colored hearts on it, but the print is so small and subdued that it reads as a solid from a foot away.  I think that it will work just fine.  But, I have yet to make one of the names to test it.  That's up next, I guess.  I really need to figure that out so I can know what direction to go in next. 


Here is the finished name banner for my GD, all bound labeled and already gifted.  We gave it to her on Saturday (along with some "spy" walkie-talkies!).  It seemed to be a hit.  We were watching the girls while Mom and Dad went snow-shoeing.  When the parents came back, this was the first thing she showed them.  And then she asked her Dad if they could hang it in her special reading spot.  I think that's a success! 

I put 5 little tabs on the top edge of the back so that we could put a dowel in there to hang it with, and so it would be evenly supported.  At 31" inches long, it needed the support.  That took a little thought from me.  I caught the tops of the 1 inch wide tabs in the binding and hand-stitched the bottom edge of them down.  For my little quilts, I just hang them with straight pins, but I don't think my son and DIL would do that.  I wanted to make it easy for them to hang this up.  I need to remember how I did it so I can do it again, so I took some pix of it.

And now, I need to make one for little sister, who's birthday is next month.  I have the border fabric picked out, and just need to find the fabrics for the letters.  Oh, and find the time to do it. 

I seem to be having an explosion of creativity lately, which is good.  Except for the fact that I can't sew fast enough to keep up with myself.  And my quilt studio LOOKS like there was an explosion in there!  *grin*

On Monday, I took a class on how to use my new (in November) Brother sewing machine.  I finally learned how to use the needle threader - Yay!!  I also learned other useful stuff, but this was something I just couldn't for the life of me figure out from the directions in the manual.  Now I get it.  I'm a visual learner and I need to "see" how it's done.    

I've got some links to share with you.  I've been spending probably too much time looking at quilt blogs etc. lately, and have found some fun stuff.  Maybe I'm late to the party and everybody already knows about all these, but for those who don't, here ya go:

First up, Tonya has started a new blog for all things "Unruly" - called, amazingly enough, Unruly Quilting.  It's a place to share all your Unruly-ness.  She's also requested "Bah Humbug!" blocks in Christmas-ish red and lime green.  I'm just blown away by everyone's creativity on this blog!  You should see the wonderful bugs and letters that everyone is making - it's just awesome. 

Leeann at Quilt Whangarei has a great tutorial on how to do the Disappearing 4-Patch.  I'd seen some quilts made with this block around the internets, and couldn't quite figure out how it was done, so this is great to know.  Another fun, easy quilt technique!  Check it out and give it a try. 

The Bent Objects blog, by Terry Borders, is just so inventive and funny.  He does some amazing things with wire.  His creations are difficult to describe, so it's best to just go take a look.  Terry also has a book out - "Bent Objects: The Secret Life of Everyday Things", which is available at both Amazon and Borders.

More in a similar vein is Stupid Creatures.  John makes stuffed toy monsters and clay "Beasties", some of which are pretty darn cute and some are funny.  Check out the toys here and the clay Beasties here.

Over at BoingBoing website, they had a competition to take something that is usually computerized and remake it with natural media.  Be sure to note the QR Code Quilt made from recycled clothes.  (No, I don't know what QR Code is!)  But all the entries were inventive and fun.

Do you like to take quizzes that purport to tell you about yourself?  Well, here's a couple for you.

First is the free on-line quiz to find out what your Meyers-Briggs Personality Type is, in case you don't know.  This is fun and gives you a description of your personality type.  This is a good tool to help you understand yourself and how you act and react in the world.  Enlightening! 

Second, How About Orange blog has a link to a quiz to find out what your design type is.  This one is a visual quiz - which picture appeals to you the most.  Different and fun.

Well, enough folderol for now.  Time to get busy!

Sunday, January 16, 2011

Actual Sewing Has Occured!

But first, some photos from our trip to the Olympic Peninsula last week.

This is Ruby Beach, which is right on the Pacific Ocean.  A very Pacific Northwest-looking beach.  Note the logs all over the beach.  That's pretty common on the beaches up here. Those things are at least the size of telephone poles. 


This is another shot of Ruby Beach.  It's beautiful, but it was cold that day!  It snowed the previous night, although there was none on the ground in this area.  I'd never been to the beach in the winter before. 


This is Kalaloch Beach, right by the lodge that we stayed in.  A very flat beach, with lots of continuous waves.  There are lots of rocks out there in the water, so I don't think it's ever much of a swimming beach. 

What was really amazing to us was that there was NO cell phone service in this area!  We were shocked . . . we never expected that.  30 minutes north or south of Kalaloch had service.  I actually had to use a pay phone, for the first time in a lot of years, to get in touch with my sister whom we were meeting.  And I think it's, I don't know what word fits here, sad maybe, that we've come to expect to be able to use a cell phone, no matter how remote we are.  It wasn't that many years ago we didn't have cell phones and thought nothing of being out of touch.  Times change, I guess.  Or am I just showing my age? *grin*

We were about 30 minutes or so south of Forks, Washington which is the setting for the Twilight series of books and movies.  If you go to Forks, you can get the "Twilight Tour".


I finally got a start on the Civil War blocks.  I got my new Prussian Blue fabric (see previous post) washed and ready just in time to use it!  And now I'm behind again.  I don't know how long I can keep this up!  But I'm really enjoying the history and the photos on Barbara Brackman's Civil War blog.  If you haven't seen it yet, hop on over and check it out.  There's also a Flickr page where you can see what everyone else's blocks look like.


Here is the project I started using Tonya's new book, as I mentioned in my previous post.  I got all the letters done, following the instructions.  (they were all good, Ton!)  The A didn't come out quite as I had envisioned it, but I used it anyway.  I ended up trimming down the S and the E. . .  they were just too fat.  (Oh, if only losing weight were that easy!)  For a change, I picked out the border fabric first, then based the letter fabrics on that.  DGD's room is painted green and her favorite color is blue, so that was a factor too.  (DGD is 8, and I didn't want to get too wonky.  They are not a "wonky" family.)


My first thought was not to use spacers between the letters, but then I decided things looked better (easier to read) with the spacers.  For me, the hardest part is always putting the letters together.  It seems so complicated at first.  And I'm never sure how much to make them "dance" up and down.  But I just started sewing two together here and two together there, and before you know it, it's not so bad.  I did have to keep adding more background to the top of the letters.  Too much is better than not enough!


Then I decided that the wall hanging needed a heart on it.  This was my first attempt.  But I didn't like it - too pointy at the top.


So, I gathered up my courage and trimmed, just like Tonya says.  I figured, what the heck, I had nothing to lose!


Much better now.  Not perfect, but that wasn't my aim anyway.


Now, where to put the little wonky heart?  I think this corner is already too busy, don't you?


All finished.  Well, first finish, I guess.  I've found something for the back, and I have to go dig in the box of batting scraps for a piece the right size.  I have one week to get it quilted and bound.  This finished at 16 inches tall by 31 inches wide.


The other night when I couldn't sleep, I was pondering quilt designs, as I often do when I can't sleep.  I remembered these little plaid kitties that I appliqued a few years ago.  At the time, I thought they were cute, but had no idea of what I wanted to with them.  Now I have an idea!  I'm going to add the names of all my cats I've owned to these guys. 


OK, this is Step One.  I've sewn plaid fabric around all the cats.  The blocks are now in the 11 to 12 inch range.  I don't know if they'll stay this size or get cut down some.  It'll come to me.  I'm trusting the universe to tell me what the quilt wants.

I'm not sure how to do this quilt, but I thought I'd just start sewing and see what happens. I'll make parts and pieces and see how they all fit together. Sue at The Magpie's Nest has inspired me to attempt this.  She's been doing a lot of this lately, and it's been fun to watch her process.  I'm having some difficulty in not planning this out. . . . it's hard to let go of that. But if I wait for inspiration (without active particpation on my part), the kitties will continue to languish in a box. I do know I want to continue using the plaids, and I want this to be a useful size, because Lord knows I have wallhangings up the kazoo and very limited wall space. So, that's the parameters I'm starting with. It'll be fun to see where this goes.


And I just can't sew without my Studio Cat helping me. . . because he won't let me!  Shade's very possesive of his responsibilities in the quilt studio and he won't let Dunkel in to participate, either.   So, I guess that makes everything I do a collaborative effort.  I do the sewing and Shade contributes cat hair and purrs.  Hee hee!

Tuesday, January 11, 2011

1-11-11


This last weekend we went to the Olympic National Forest with my sister and her sweetie.  We had a lot of fun together.  I'll tell more about that in my next post, along with some photos.  Anyway, I got a chance to get an updated photo of her flower stitchery that I showed in my previous post.  This photo isn't the best, because I only had one little lamp for lighting.  So, the photos were either over- or under-exposed.  But this is pretty close. 


Here are the  blocks I made for the Block Lotto this month.  I think these would make a great charity quilt.  The blocks use 2 1/2 inch strips.  They're fun and easy to do.  The block is called "Stacks".


I've started making a name block for my DGD#1 for her birthday this month.  I'm actually following the instructions in Tonya's book for these.  I thought I'd try them out!  hee hee!  Oh, and the order of the letters has no relation to how they are in the name, by the way.  Hmm, it looks like that Y might be a little small.  Or maybe I need to trim the other letters down some.  I started with the S because that is the one that is the hardest to make small, so all the other letters can be made to co-exist nicely with it.  I have another 4 letters to go, and I seem to be having some difficulty getting into the quilt studio lately.  Sadly, there's too many other things needing my attention.  *sigh* 


Barbara Brackman has started a new blog about Civil War quilts/blocks and history, and is having a quilt-along.  She's doing a block a week.  I'm thinking of playing along, although the last thing I need is another committment.  But I had to go out to the local quilt shop, The Wild Rose in Orting, today to pick up my Bernina from the "doctor".  And they have LOTS of reproduction fabrics.  Well, I have lots of shirtings and lots of indigos, of course, but no Prussian Blue.  So I just had to get some, didn't I??  And that little brown print called to me too.  Just in case I decide to do the quilt-along, you know?  I'm already behind, so I'd better make up my mind pretty quickly, I think.


And this is what followed me home from our stop in Port Angeles this weekend.  My sister had seen a quilt shop on their way through there to meet up with us, and wanted to go back to see it.  It worked out really well, because the shop owner had the Seahawks game on the radio, and the guys could listen to the 4th quarter while my sister and I scoped out the shop.  Over on the left of the photo there are 4 pieces of hand-dyed wool.  (Rust, purple, another purple and green, from top to bottom.)  I don't have a plan for these, exactly, but they were so yummy I couldn't resist.  Same with the other fabrics too!


Last week we had about 2 or 3 inches of snow that stuck around all week.  It was cold all week too, so the snow never melted, and the pond stayed frozen too.  Then about 2 days after the snow fell, we had some more "weather".  In the space of about half an hour, we got rain, then snow, then hail, then more snow.  And it got even colder.  A couple of days later when I went out to my car, I found this on the roof of the car.  Ice crystals!  In all my years of living in Michigan and other places that got snow, I don't think I've ever seen this before.  These crystals were about 3 or 4 inches high!  Just fascinating.  I hated to clean off my car.  LOL

Here's another shot that maybe you can see better.  At the bottom of the photo, you can see the roof of my red car. 

Tonight we're getting icy snow - it's actually hissing as it falls.  Sound like tomorrow is a perfect day to stay home and get into the quilt studio, doesn't it?