I wrote this tutorial for the Tacoma Modern Quilt Guild, that I belong to, and I thought I would share it with you too.
 |
| 12 inch Twin Sister block |
This block is called the Twin Sister block, among other names. This tutorial will make a 12 inch finished block.
Cutting:
* Red (background) – 1 square at 7 ¼ inches, then cut square into quarters from corner to corner, as in the diagram.
 |
| one 7 1/4 inch square, quartered |
* White – 2 rectangles at 4 ¾ inches by 9 inches
The white fabric can be solid white, white on white, or white with a blue or red print on it.
* Blue - 2 rectangles at 4 ¾ inches by 9 inches
The blue fabric can also be a solid or blue with a white or red print on it.
Think patriotic!
 |
| 2 blue and 2 white rectangles |
Sewing:
Place a red triangle on top of each blue and each white rectangle:
Sew the triangle to the rectangle along the long side of the rectangle, stopping at the end of the triangle.
 |
| sew with a scant 1/4 inch seam |
 |
| your unit should look like this |
Press the triangle open, with the seam allowance towards the rectangle. Repeat for all four rectangles and triangles.
Each rectangle now has a red triangle sewn to it. Sew one white rectangle to one of the blue rectangles in the following manner: Match the rectangles when sewing them together, orienting them so that the short side with the red triangle attached on the blue rectangle is matched to the long side of the white rectangle without the red triangle attached, as in the diagram below.
 |
The finished unit should look like this. |
Press the seam allowance to one side.
Repeat this step with the other two rectangles.
Note that the second unit needs to be oriented the same way as the first – if you sewed the short end of the blue rectangle to the long end of the white rectangle, you must do the same for the second unit, or your units won't fit together correctly.
This is what you should have at this point: two units oriented and sewn the same way.
Match the center points and sew the final center seam. Press seam allowance to one side.
 |
| Your block should now look like this. |
Your block should measure 12 ½ inches across. A little larger is okay too. You can trim all the blocks to the same size before assembling them into a top,
 |
| my block came out a little over 12 1/2 inches across |
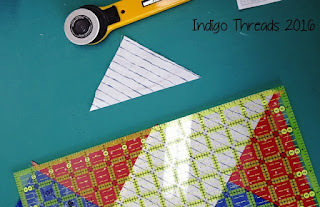
You’re now going to trim the excess off of those long rectangles, like so.
Just carefully line up the ruler with the outside edge of the red triangle and trim away the excess. Save that triangle!
The last step is to set your machine to a long basting stitch and stay-stitch the edge of those long rectangles. The outside edges of the rectangles are now on the bias and the stay-stitching will keep them from stretching until you can sew them together. Remember to handle these edges with care.
 |
| stay-stitching |
You can use those triangles you just cut off the block to make pinwheels or other units to be used in the border of a quilt, or to make a small doll quilt or tablerunner.
If you use my tutorial to make a block (or several!), please leave me a comment to let me know if you liked it. And I would love to see what you made!
Please remember that all photos are copyright of by Indigo Threads. If you share this, please give me the credit for this tutorial. Thank you!
Have a fun and safe holiday!


